Edit Product Information on the Touchscreen
Edit Product Information on the Touchscreen

OMNI machines offer a touchscreen which can display any and all information regarding the products it vends to its customers. This information is fantastic for advertising and instructional purposes, and, if done correctly, can greatly increase traffic to the machine as well as customer satisfaction following the purchase. There are many ways to customize what customers see for each product in the vending machine on the main selection screen as well as the after selection screen, which this guide will explore.
OMNI machines offer a touchscreen which can display any and all information regarding the products it vends to its customers. This information is fantastic for advertising and instructional purposes, and, if done correctly, can greatly increase traffic to the machine as well as customer satisfaction following the purchase. There are many ways to customize what customers see for each product in the vending machine on the main selection screen as well as the after selection screen, which this guide will explore.
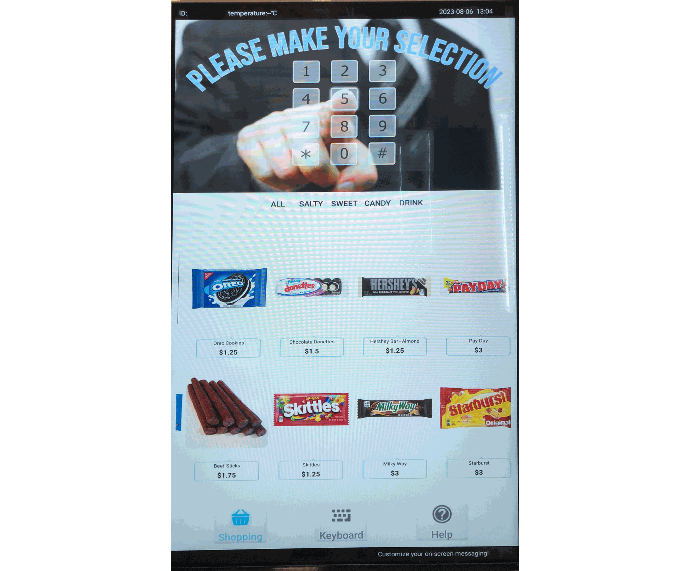
Main Shopping Screen
This is the default screen, likely displaying when the customer first comes to the machine. The products slowly scroll left and right.
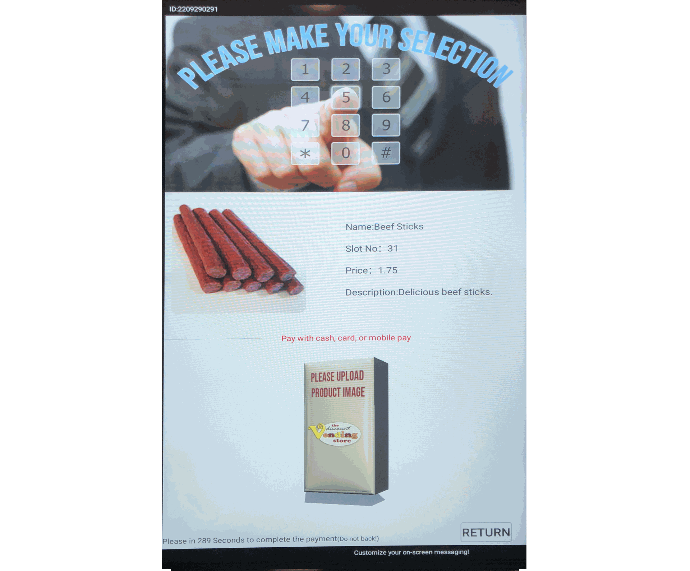
After Selection Screen
This screen shows after a customer selects a product. It contains more detailed information about the specific product.
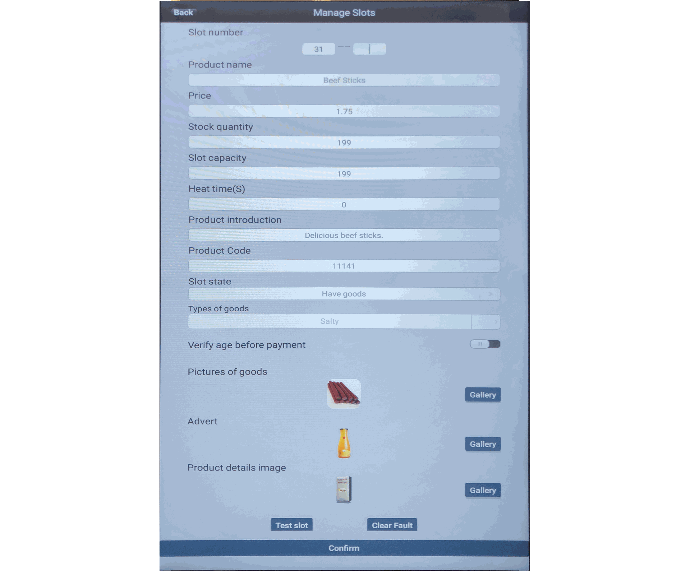
Slot Management Screen
This screen is in the admin login, and displays what fields can be changed to customize how products appear on the machine's touchscreen.
- Log into the Admin login of the machine.
- Tap the Slots Management button (the top left menu option).
- There are several fields on this screen which affect what customers see on the touchscreen of the vending machine. To edit a field, tap on the field, then type out the new value. If a popup box appears, select the appropriate option from the box, then tap Confirm.
- Slot number:
If multiple consecutive slots need the same value edited (for example, all products on the top slot will have their prices set for the same amount), then the range is determined here. The top left box is the selected product, and the top right box will be the last slot modified; all slots equal to or between these two numbers will have all changes made on this screen once saved. By default, only the top left box is filled with the slot that is selected. (Note: The top left box should not be edited.)
- Product Name: This will display the product's name on the main shopping screen and the after selection screen. (Note: The name is limited to 20 characters, including spaces. Anything longer than this is cut off at 20 characters.)
- Price: This will display the product's price on the main shopping screen and the after selection screen. (Note: If the machine has a red motherboard it is better to set the prices through the keypad menu of the machine, rather than using this method.)
- Stock Quantity: The amount of product currently in the slot. This value is not displayed to the customer. It is recommended this value be kept at 199; for more information regarding changing stock quantity, refer to the "Replenishment" section of the machine's manual. (Note: If the machine has a red motherboard it is better to set the stock through the keypad menu of the machine, rather than using this method.)
- Slot Capacity: The maximum amount of product the slot can hold. This value is not displayed to the customer. It is recommended this value be kept at 199; for more information regarding changing slot capacity, refer to the "Replenishment" section of the machine's manual. (Note: If the machine has a red motherboard it is better to set the capacity through the keypad menu of the machine, rather than using this method.)
- Heat Time(S): This field has no effect on the machine. Do not edit this field.
- Product Introduction: This will display a brief description about the product on the after selection screen. (Note: The description is limited to 200 characters including spaces. Anything longer than this is cut off at 200 characters.)
- Product Code:
A unique identifier for each product. This value is not displayed to the customer. If the machine has multiple identical products, they can be compressed into one selection on the main shopping screen by ensuring this value is the same on each of those slots. This cleans up the presentation of the main shopping screen by preventing it from becoming filled with multiple selections of the same item. The machine will vend from each slot with this product code evenly, so their stock will be vended at almost exactly the same rate.
- Slot State: This determines the state of a slot. There are three main slot states: •Have goods: This is the default setting, and will allow the slot to vend normally. •Fault: This slot state will appear if a fault has occurred on the slot, and will cause the slot to appear greyed out on the main shopping screen. It will not vend. •Hide: Selecting this option will remove the slot from the main shopping screen and the Slots Management screen.
- To add it back later, select Slots Management from the blue Menu.
- Tap Add Display Code in the top right.
- Type in the slot number to add it back.
- Types of goods: This is where a product's category is chosen. Categories appear on the top of the main shopping screen. Tapping a category will only show products with that category. To add a new category, tap the arrow to the right of the field. Each category name has a limit of 6 characters, or 12 characters broken up into two words. (Note: Category is not enabled by default, it must be enabled in the Information Settings option from the main Admin login menu.)
- Verify age before payment: This functionality is either not enabled on this machine, or is enabled elsewhere. Do not edit this field.
- Pictures of goods: The image of the product shown on both the main shopping screen and the after selection screen. To edit, tap the Gallery button to the right of it, and select any image loaded on the machine. To load new images on the machine, consult the "File Explorer" section of the machine's manual. (Note: Pictures of Goods images should be at least 500 x 500px at 72ppi and must have a square ratio or will be distorted. Supported file formats are .jpeg, .png, and .jpg.) Product media is saved in the ImageGoods folder of the machine's memory. For information on how to access and add or remove files from this folder, consult the machine's manual.
- Advert: The top image or video on the after selection screen. Editing this field will have a specific image or video display on the after selection screen when this product is selected. Otherwise, all images and videos for the advert section will display one by one in a loop. By default, this will be an orange juice bottle (on the Slots Management screen only), indicating nothing specific will display in that space. To edit, tap the Gallery button to the right of it, and select any image loaded on the machine. To load new images on the machine, consult the "File Explorer" section of the machine's manual. (Note: Featured videos should be at least 1080p. Full HD video is supported but will require more memory and CPU to play. Supported file formats are .avi, .mpeg4, .mp4, .wmv, .mkv, and .flv. Images in this field should be at least 1920 x 1080px at 72ppi and must be 16×9 ratio or will be distorted. Supported file formats are .jpeg, .png, and .jpg.
If a video is not compressed enough or takes up too much memory, it will not play. Try compressing or otherwise reducing the memory of the video and re-adding it to the machine.) Advert media is saved in the VideoAndImageAd folder of the machine's memory. For information on how to access and add or remove files from this folder, consult the machine's manual.
- Product details image: The bottom image on the after selection screen. By default, this will be an orange juice bottle (on the Slots Management screen only), indicating nothing will display in that space. To edit, tap the Gallery button to the right of it, and select any image loaded on the machine. To load new images on the machine, consult the "File Explorer" section of the machine's manual. (Note: Product Details Images should be at least 1920 x 1080px at 72ppi and must be 16×9 ratio or will be distorted. Supported file formats are .jpeg, .png, and .jpg.) Product details image media is saved in the ImageGoods folder of the machine's memory. For information on how to access and add or remove files from this folder, consult the machine's manual.
- Test slot: This button will test vend the selected slot without requiring payment to test if an item is vending properly.
- Clear Fault: This button clears any faults on the selected slot.
- Slot number:
If multiple consecutive slots need the same value edited (for example, all products on the top slot will have their prices set for the same amount), then the range is determined here. The top left box is the selected product, and the top right box will be the last slot modified; all slots equal to or between these two numbers will have all changes made on this screen once saved. By default, only the top left box is filled with the slot that is selected. (Note: The top left box should not be edited.)
- Once all desired changes are made, tap the CONFIRM button on the bottom of the Slots Management screen to save them to the range of slots specified (by default, only the top left slot number is filled, meaning only this slot will be changed.)
- Changes may not immediately be made. If the new information is not present on the main shopping screen or the after selection screen, turn the machine off, wait 30 seconds, then turn the machine back on.
Didn't find what you were looking for?
Feel free to reach out to our esteemed technical support department to answer any questions you may have over the phone at (719)-301-4648 or over email at tech@remarcvending.com or you can fill out a support ticket to the right.
Didn't find what you were looking for?
Feel free to reach out to our esteemed technical support department to answer any questions you may have over the phone at (719)-301-4648 or over email at tech@remarcvending.com or you can fill out a support ticket to the right.